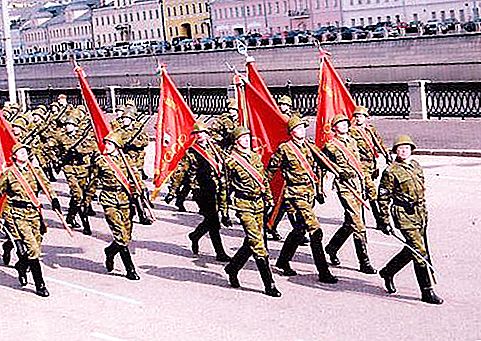
Combat drill is one of the most important conditions affecting cohesion and combat readiness in the army team. Clear and coordinated actions of personnel performing combatant techniques with and without weapons are considered to be its vivid indicator.
What are drill exercises for?
Combat techniques with and without weapons are necessary to maintain order, organization and discipline in the army team.
In the end result, tactically trained units are characterized by resistance to long-term stresses, speed and accuracy in the execution of commands and signals, skillful and coordinated actions in combat conditions. Performing combat techniques with and without weapons makes each soldier unquestioningly obey the commander. Also, the personnel acquires the following qualities:
- Correct and fast execution of commands.
- The habit of observing exemplary appearance.
- Collective responsibility, mutual assistance, serious behavior both in the ranks and outside it.
Tactical combatant techniques with weapons are necessary for the coherence of the company or battalion in possible combat conditions. The combat charter contains a combat training program, which outlines all the rules and regulations regarding tactical drill exercises for the entire training period. The line-up coordination of each unit is evaluated by specially appointed inspectors.
Features of the classes
One tactical drill occupies the development of three or four training questions, each of which is divided into separate elements. At the very end of the work, they are connected and worked out together. When conducting receptions with the formation, the commander must clearly and briefly give commands and instructions. For carrying out combat exercises, a drill parade ground or a specially equipped platform is used.
Start of classes
Classes begin with the disclosure of the topic “Combat techniques and movement without weapons”, in which servicemen get acquainted with the elements of the system. They learn what “flank”, “line”, “front”, “interval”, “closed” and “open order” mean. Combat moves and movement without weapons are performed after the command given by the commander. For this, in addition to the order by voice, flags and lanterns can be used. Also, the commander can give a signal by hand.
Arms on site without weapons
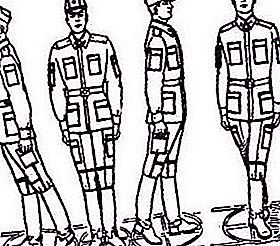
After the commands “Socks together!” and "Socks apart!" military personnel must, according to the task, put heels on the front line. After the command “Become in the line!” trainees without tension become in line. With the command "Attention!" privates are required to deploy socks to the width of the foot. Hands should be lowered along the body so that with bent fingers touch the hips. Knees should be straightened, legs not strained. Students are required to pick up a stomach, turn their shoulders and look in front of them. Exposing the chin is not recommended. Soldiers in this position are ready to act quickly.
Performing drill without weapons does not exclude possible errors of the trainees. These include:
- Excessively narrow or wide toe socks.
- Arms bent at the elbows.
- Head down.
- Palms turned back.
- Belly forward.
It is also considered a mistake if the student transfers the weight of the body to the heels.
Drilling techniques without weapons are performed at least five times.
Turning in place
Arms without weapons include cornering. These tasks are carried out by soldiers one by one after the commands “Left!”, “Right!”, “Around!”.
These drills without weapons are being carried out. Trainees after the “Right!” Team must perform the following steps:
- Rotate the housing to the right. For this, the right heel and the left toe are used. Performing the task, the soldier should not bend his knees. To perform this technique, it is important to learn how to turn, while maintaining the correct drill stand and hand position. It is important that the weight of the body is on the front leg.
- Put the hind leg to the front. In this case, the socks should be deployed so that the distance between them corresponds to the width of the foot. When the team "Left!" trainees perform similar actions with the only difference being that the body rotates through the left shoulder.
Fulfilling the command “Around!”, A soldier performs:
- Vigorous turn to the left, using the left heel and the right toe.
- The housing must be slightly forward.
- Hands should be held along the body with hands turned by palms to the body.
- It is necessary to position the legs after the turn so that their socks are in the same front line. The distance between them should correspond to the width of the foot.
Trainees learn turns according to the appropriate command. In this case, the team itself is divided into two parts:
- A preliminary is served to the soldier in order to prepare him for action. The soldier already knows what action the commander requires of him.
- Executive is a signal to the beginning of action.
"Right!". The ending “-to” is considered to be the executive part of the team, after which its implementation should begin.
Serviceman on the account "Once!" carries out drill step from the left foot. Hands should perform one stroke in time with the movement. After the step, the student stops, and his hands fall along the body. The toe of the left foot should be pulled. It is necessary that its distance to the ground is 200 mm.
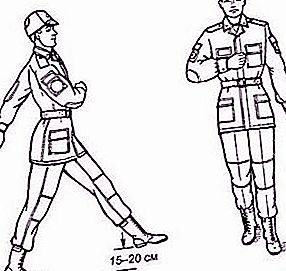
After the combat step, the foot should stand firmly on the ground with the whole foot. As soon as she lands on the ground, the student begins to lift the next leg. Into the account “Two!” on the left foot you need to turn right. The right leg is extended forward. At the same time, one swipe is made by hand. Into the account of "Three!" the left leg is attached to the right. The servicemen, taking a step from the left foot, carry the right hand forward, and the left - to the limit back. When moving from the right foot, the left hand is moved forward, and the right is retracted. To develop these movements to automatism among students, special exercises for the hands have been created. They are performed, standing still.
How to give military honor on the spot?
Follow the command “Give honor!” a soldier can without a headgear in place. To do this, he should be turned towards the commander in the "Smyrno" stance. If a soldier has a hat, then honor is given using his right hand. To do this, you need to put your fingers together so that the middle touch the visor. The palm when giving military honor should be straight. The elbow of the right hand rises to the height of the shoulder. Turning his head toward the commander, the serviceman does not change the position of his hand. When the senior in rank goes further, the soldier must turn his head back. Then the hand drops.
How is honor given in movement?
Follow the command “Give honor!” a soldier may be out of order. If there is no headgear, then the distance between the soldier and the commander should be six meters. Performing a movement near the bosses, you need to turn his head in his direction, and swinging his arms to the beat stops. They resume after a soldier passed the commander. If a soldier has a headgear, military honor in the movement should be given with the application of his right hand to the visor.
In this case, the left hand should be pressed to the hip. After the commander is completed, the soldier’s head turns directly in front of him, and his right hand drops.
Receptions for exit and return to duty
A soldier can leave the system only at the command of a senior in rank. Having heard your surname and the instruction “Fail!” (at the same time, a certain number of steps is indicated), the soldier must answer: “I!” and "There!". Then he takes a marching step. After he has passed the front line, the soldier is obliged to begin the counting of steps. Having completed their number indicated by the commander, the student must turn to face the ranks. If an ordinary soldier is in the ranks, in the second row, he needs to put his left hand on the shoulder in front of the one standing so that he misses it.
You can get back into operation after the command "Become operational!". A soldier must perform the following actions:
- Turn to the commander and say: “I!”.
- After the executive team, answer: “Yes!”, Put your hand to the peak of your headgear.
- Turn around.
- Perform the first drill step and lower your hand.
- Return the same way back into operation.
Weapon Training
Drill techniques with weapons in place are carried out using a machine gun. It can have both a wooden and a folding butt. Before starting classes, the weapon is subject to inspection. The machine must stand on the fuse, and the belt is fitted to be worn in any position.
How is the belt of the machine adjusted?
After the command of the commander, “Release the belt!” or “Tighten the belt!” from a serviceman is required:
- Raise your right hand up (it slides along the belt of the weapon) and remove from the shoulder.
- Using your left hand, grab a weapon.
- Take the machine with your right hand. If the weapon has a folding butt, then it must be decomposed. To do this, the left hand holds the machine, and the right holds the latch and leans the butt.
- To the right side make a half-turn.
- Set the left foot aside. The butt of the weapon should rest against the foot of this leg. The barrel of the weapon should be located on the bend of the elbow of the right hand.
- Perform a slight forward tilt.
- With the right hand, hold the belt of the machine by the buckle.
- Using your left hand, you can tighten or release the belt.
During this reception, the legs of the soldier should not bend.
After completing the task, the student independently becomes back in the combat station.
What is a weapon drill stand?
On-site combatant techniques with weapons begin with familiarization of servicemen with a combatant stand. It is identical to a drill stand without a weapon.
There are three options for positioning a weapon in a drill stand and in motion. For each of them there is a corresponding command: “On the belt!”, “On the chest!”, “On the back!”.
With the drill stand "On the belt!" the machine is held up by the barrel. The right hand with the brush should be in contact with the upper edge of the belt. For the manual (company) machine gun, a place is provided at the foot. The right hand in this drill stand is freely lowered. The butt plate of the machine gun butt should rest against the ground, touching the right foot of the serviceman.
For a drill stand with a carbine, the same position is provided as with a machine gun. With the difference that the gas pipe of the weapon should be clasped by the freely lowered right hand.
Team "On the belt!" used every time before changing the position of the machine or carbine. It is served before the command "On the chest!" or "On the back!".
After the command “On the belt!” the machine with the wooden butt must be positioned so that its muzzle is at the top. The weapon, the butt of which is folding, on the contrary, is located with the barrel down.
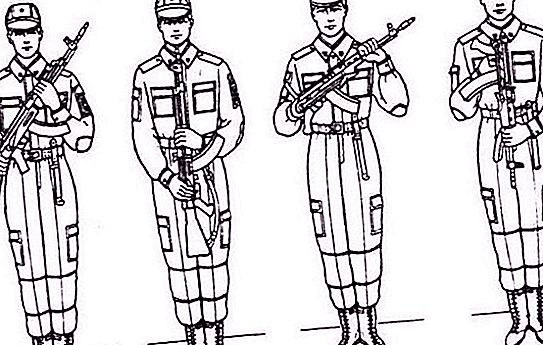
The machine should hang on the right shoulder. At the same time, a soldier is required to bend his right hand at the elbow and press him to the body. Weapons are held with the right hand on the belt. The left arm must be lowered along the torso.
Team "On the chest!"
Arms with weapons include knowledge and skills of personnel to carry a machine gun. Having received the command “On the chest!”, A soldier armed with a weapon with a butt must perform the following actions:
- Remove the machine from the belt with your right hand and grab the forearm with your left. The weapon must be held in front of itself in an upright position. In this case, the machine gun should be turned to the left, and the muzzle end should be located at the level of the height of the chin.
- Throw the belt over your head while lowering your right hand. The stock is held with the right hand.
For a soldier using a machine with a removable butt, the command "On the chest!" performed by two tricks:
- With the right hand, remove the weapon from the shoulder. Left hand held forearm. The grip of the barrel is made from the bottom. The machine magazine should be pointing down, and the muzzle - to the left.
- Using your right hand, toss the belt over your head so that the machine hangs on your left shoulder.
Team "On the back!"
Performing combat techniques with weapons in motion on the command "On the back!" begins after the weapon has taken the position "On the belt!". Exercises are performed using machines equipped with wooden or removable butts. To do this, the soldier, whose weapon has a folding butt, you need, with your right hand holding the machine gun at the barrel, transfer it behind his back. Military personnel begin to learn combat techniques and movement with weapons on the command "On the back!" after the bayonet-knife is removed from the machine. After dismantling from the weapon it should be fastened on a belt. Learning these techniques begins with the command "Arms behind your back!". A soldier must perform the following actions:
- Into the account “Once!” hold the machine belt with your left hand. In this case, the right hand holds the butt down.
- Into the account “Two!” the right hand lifts the weapon, and the left throws a belt over his head. The machine should hang on the left shoulder, and hands should be lowered.
Team “To the foot!”
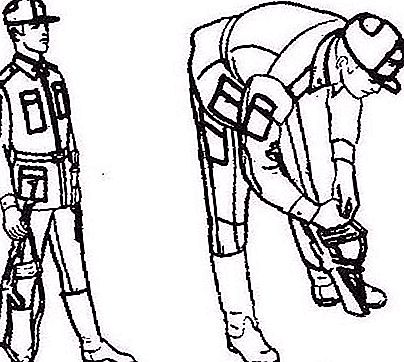
Drill technique "Put a weapon!" performed by the following actions:
- A soldier is obliged to take the machine with his right hand.
- Take a step forward with your left foot.
- Bend down and put the machine on the ground so that its bolt frame is at the bottom, and the butt plate of the butt was next to the right foot.
- Straighten up and stand in the combat stance. For this, a soldier needs to put his left foot back to his right.
When executing this command, students make the following mistakes:
- During the tilt, the right leg is bent.
- At the beginning of the reception do not perform a full step on the left.
- Do not look ahead in front of you.
Military personnel armed with a carbine perform this command using the following three tricks:
- The left hand quickly drops. The right hand at the same time clasps the forearm of the carbine in its upper part.
- The right hand of a serviceman carries a carbine to the side of his right leg. The shutter expands to the learner. The left hand in this technique is used to maintain the carbine. She grabs the bayonet tube of a weapon. The butt of the carbine should be in contact with the foot of the right leg. The weapon itself is located near the hip.
- The left hand quickly drops, and the right puts the weapon on the ground.
Team “On the shoulder!”
The position of the carbine or assault rifle from the position "To the leg!" to the position "On the shoulder!" changes using the following techniques:
- The right hand lifts and rotates the weapon so that the bolt is in front. Then the machine gun or carbine is transferred to the left side, while the right hand at the same time intercepts the weapon by the receiver and forearm. The left hand moves forward a little. A butt lays on her. As a result, he should lie down on his palm with his butt pad: the thumb is located in front of the butt pad, and the rest are pressed to the butt on the left side. When using the left outstretched arm, the carabiner is held on a plumb line. The elbow of the right hand should be at shoulder level.
- The right hand quickly drops, and the left hand raises the carabiner until its bracket rests in the shoulder shoulder. The weapon is held without its rolls to the sides. The left hand needs to be positioned lower than the elbow, the butt is pressed to the belt.
The study of turns and movements with weapons
Performing combat techniques with weapons in motion is the same as without weapons. Having received the command “To the foot!”, The serviceman lifts the machine gun and gives the bayonet to himself. The right hand is pressed against the hip. After turning, the weapon drops to the ground.
In the process of executing the commands “Run!”, “Step!”, “Stop!” students learn combat techniques and movement with weapons. So, after the “Step!” Command a soldier lifts his assault rifle. While running, the elbow of his free left hand is bent. The weapon is on the right, which also bends at the elbow. The machine gun or carbine with the muzzle should protrude forward. If the system in which classes take place is closed, the bayonet turns inwards.
When moving with a weapon located in the “On your back!” Position, both hands of a serviceman perform sweeping movements in front of them. If the machine is located in the positions “On the chest!”, “On the shoulder!”, “At the foot!”, The soldier has one left hand free. She performed the swing in time with the movement. After the “Stop!” the serviceman stops and independently returns the weapon to the “To the leg!” position.
After the team “On the shoulder!” the carabiner can be lifted from the ground, as on the spot, using the same techniques. They should be started while the left foot is positioned against the walking right. The implementation of each technique is accompanied by the obligatory attaching of the left leg.
During the movement, the machine located in the “On the shoulder!” Position, after the “To the leg!” Command lowered using three tricks similar to the position in place. Having received the command, the soldier must step with his right foot, put his left foot on it, and only then begin the execution of each technique.

")

