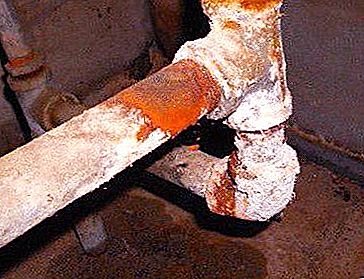
Replacing the water supply (whether it is a house, an apartment - it does not matter) is an urgent problem for many residents. First of all, this procedure is carried out at the end of the service life of steel water and sewer pipes. They can be destroyed due to corrosion, rotting of the metal or non-compliance with the working pressure in the system. Replacing the water supply in an apartment requires special skills. Therefore, it is better to hire specialists who will do the job quickly and efficiently.
Special devices for replacing water pipes
Lerka is a tool that serves to create threads on a water pipe or other similar products. Replacing the water supply system can not do without this device. It is a metal nut, in the hole of which contains special teeth.
General Information
The teeth are located at different angles so that a thread is created on the water pipe during rotation of the nut.
The edges are cut using a cutting element - a cone. Their number may be different. As a rule, the creation of threads on a water pipe is carried out using a solid round lehr. Such a device is mounted on a special surface and can have up to five cutting elements. Special devices of the lehr when replacing a round-type water supply system allow cutting metric and inch threads. The tool has a significant advantage. All three edges are involved in the work, so the thread is created in one pass.
One-piece and sliding lehr
When replacing water pipes or sewers, there is a need to create a thread. The most popular fixtures are solid and sliding lehrs.
The first type allows you to get high-quality turns on the pipe in a short period of time, while receiving not only metric but also inch threads. The process is fast, as the tool is made of high quality hard metal.
Its disadvantage is the short life. Such devices are used in the case when it is not necessary to observe accurate indicators when creating turns. During operation, the device can spring, which leads to a change in the diameter of the water pipe. This difference is not significant and is only 0.1 mm. Another negative feature of the whole lehr is the low degree of rigidity, because of which the thread does not always turn out clean and correct.
The sliding type fixture has special guiding elements in its configuration, due to which the creation of thread is easier. Such a tool consists of several parts that are attached with screws.
The latter elements are used to control the accuracy indicators of the turns. To make the threading process more efficient, you need to purchase a set of dies that serve for cutting a variety of diameters. In this case, you do not need to spend a lot of time and effort.
Operation tips
The replacement of the water supply is accompanied by the creation of a thread on the pipes. In order for the final result to be of high quality, and the cutting device does not fail, it is necessary to adhere to some recommendations:
- thread creation is performed only by a serviceable tool;
- cutting elements must be sharpened;
- Before starting work, the water pipe must go through a series of preparatory steps: paint and dirt are removed from the surface;
- at the end of the pipe a chamfer is made using a file or grinder;
- during operation it is necessary to periodically lubricate the cutting elements. For this, there is a tool that has a peculiar composition.
Completing of the work
With the help of a fishing rod, you can quickly and efficiently create the necessary type of thread, regardless of the type of water pipe. Work should be performed in the following order:
- The water pipe is fixed in a vice (you can use other tools).
- The pipe is cleaned of dirt and paint, then with the help of a file the outer chamfer is removed.
- A lerka with a pre-installed nozzle for the required diameter is inserted.
- The cutting elements and pipe are lubricated with a special tool.
- The lerka should be perpendicular to the axis of the pipe. If the device is installed at an angle, the thread will be of poor quality, and the diameter of the pipe will change.
- The rotation of the watch is clockwise. It should be smooth, without sharp jerks.
- After achieving the desired result, the lerka rotates in the opposite direction, thereby removing metal chips.
- In the process, it is necessary to periodically lubricate the pipe and cutting elements with a special substance.
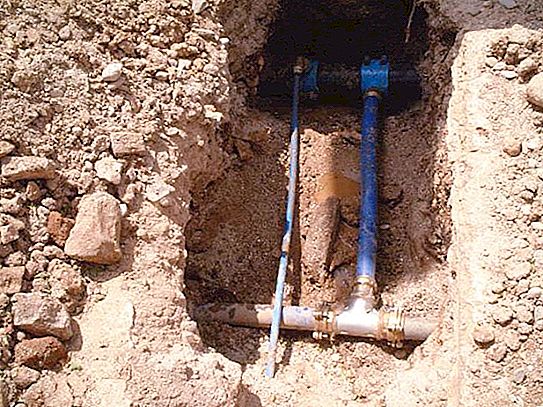
Where to start the replacement of plumbing and sewer risers?
If you live in a multi-storey building, the replacement of the water supply or sewage system begins with the receipt of a special permit. It can be obtained from the housing maintenance service. In addition, neighbors are warned of upcoming work. Disconnection of water supply is carried out only by a specialist.
Replacing the risers of the water supply and sewerage can be carried out by the whole entrance. This procedure will be much simpler and cheaper. Therefore, this issue is best agreed with all tenants and find a common solution. If the decision is positive, then the riser can be made of polypropylene. Otherwise, the landlord will have to mount steel pipes again or spend money on adapters from metal to plastic.
Riser material
Choosing the right material is not such a difficult job. The replacement of the water supply is preceded by the choice of the main and auxiliary pipes. They are made of the following materials.
Steel
Such pipelines are able to withstand large changes in pressure and temperature. The negative sides of this material include the appearance of plaque inside the pipeline, the susceptibility to corrosion that occurs during operation. In addition, the installation is quite time-consuming, since it is necessary to use a welding machine. Pipes are used for the installation of water and sewer systems.
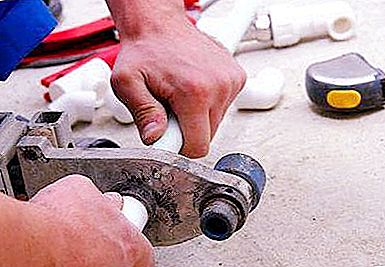
Polypropylene
Despite the light weight, pipes made of this material are quite durable and are able to withstand pressure and temperature drops. To install them, you need the presence of butt elements, a soldering iron, a rope, etc. Installation can be done independently. Among the shortcomings highlight the impossibility of parsing the finished structure. If one of the elements breaks, you will have to saw the entire structure. It is used not only for sewer and water risers, but also for other branches.
Replacing a water riser
Before installing the mechanism, the valves in the water supply are replaced or installed - if they are absent. Old systems are equipped with a crane. To avoid leaks, it is better to cut it off and install a ball valve.
It is located closer to the riser on the reverse. The installation process begins with an inspection of the butt joints at the neighbors. If they have plastic pipes installed, then fastening will not cause any special difficulties. The polypropylene construction is connected using a soldering sleeve. If the neighbors have steel pipes, you will have to make a special adapter from metal to plastic. Such places should often be checked for strength, as leaks can occur. This work can be done independently. However, in case of unsatisfactory condition of the steel pipe, it is better to call the master. If the adapter is installed incorrectly, it will burst. Using a special tool (lerki), a thread of the corresponding diameter is cut. It is best to do 5 turns. Another way to join metal and plastic is to install a collet coupling having an internal thread. To keep it better, use sealing material - fum tape. The sleeve is screwed onto a steel pipe, then a polypropylene pipe is attached using a soldering iron. After all work is completed, the entire system is checked.
Replacing sewage
When installing a sewer riser, it is necessary to dismantle the old structure. The steel pipe is cut with a grinder in such a way that there are indents on the top and bottom of the structure. The top indent is 10 cm, and the bottom is about a meter. And we are talking about the distance from the tee. It is not worth cutting the pipe completely, as further installation problems may arise. A wooden wedge is inserted into the cut off top and hammered. Beat with a hammer until the pipe bursts around the perimeter. Next, the wooden wedge is pulled out and with the help of a grinder, a conical chamfer is performed. It is done on undestructed elements. The lower part of the sewer riser is a piece of pipe and a tee. These elements are pulled out manually by swinging the pipe in different directions. If difficulties arise, the tee is cut off by the grinder. Thereby, the bell is freed. Then it must be cleaned of dirt and dust.
The new riser is first assembled in draft form, where the place of attachment of the main and auxiliary elements is determined. The bell is placed in a plastic tee, and their diameters should have the same value. Otherwise, you will need to install an additional adapter. If the structure is assembled correctly, then it is disassembled, and clamps will be attached to the wall, which will fix the new sewer riser.
Sewerage system installation
To begin with, the cuffs are chamfered outward and lubricated with a special sealant. It is also necessary to process all structural details of the future sewer system, for example, chamfers on pipes and adapters. The whole structure is assembled in the same sequence as in the draft version. All connections should be carefully mounted so that no leaks appear. The last step is to fix the screws on the mounting clamps.
In some cases, replacement or installation of a tee is required. Many experts recommend embedding a tee in a sewer riser in the following sequence:
- The necessary place in the riser is cut with the help of a grinder.
- All edges are processed with a file or other grinding device.
- The pipe on which the compensator will be located is lubricated with sealant.
- The compensating element is mounted on the pipe. In this case, there must be space for mounting the tee.
- The pipe is lubricated with sealant, and a special tee is attached to it.
- The small side of the compensating element is lubricated with sealant and attached to the pipe so that it fits snugly against the tee.
- The design is ready to use. Further assembly takes place in the same sequence.


